

I’ve been asked a few times about my method and process for gilding, suggestions on materials etc so here we go.
First off, I have to say that all materials knowledge is nabbed wholesale from Julie Caves at Jacksons Art Supplies who gave me all the recommendations that got me started. So any art supply links in this website will go to Jacksons. I’m sure other art supply shops also exist.
Enough caveats. Let’s talk materials.

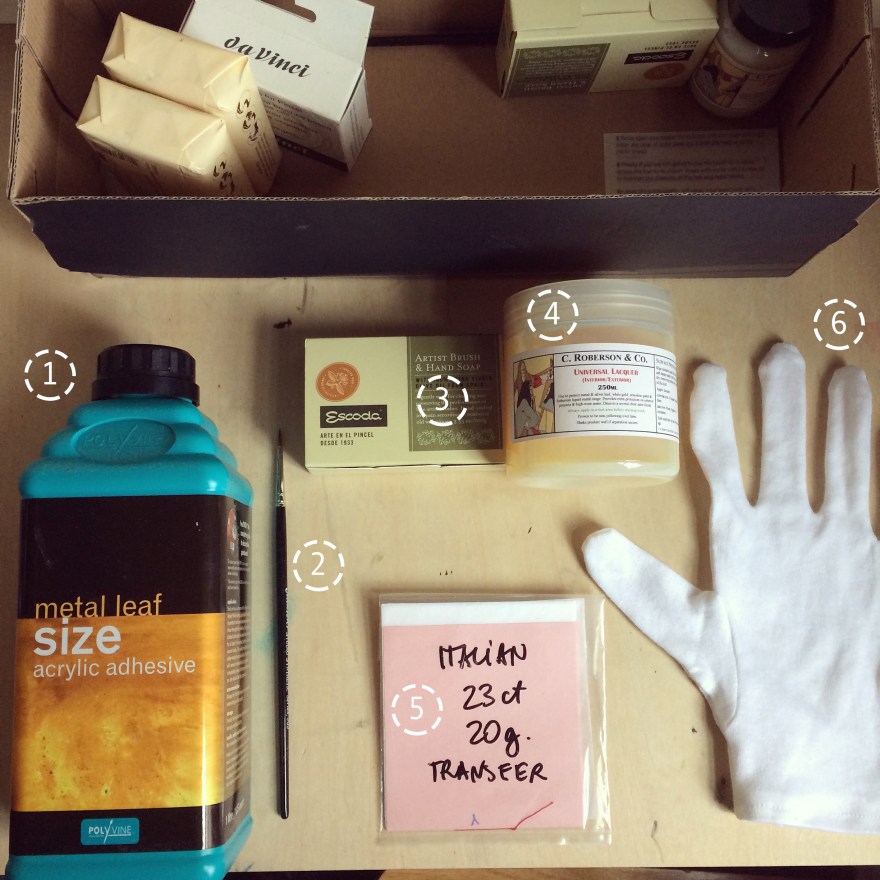
Art supplies and materials for working with gold leaf on paper
1. Acrylic adhesive
Special adhesive for metal leaf, Polyvine acrylic gold size available here. This is what you’re going to use to make the surface the gold adheres to.
2. Brushes
I use one for use with the adhesive above, and one for working with the gold leaf. Only the glue brush shown here, so keep an eye out for a black brush in other pictures. I use brushes that look significantly different so that I don’t mix them up.
3. Soap
Any kind of surfactant can be used, but I use Escoda or DaVinci specialist artist brush soap which is gentle enough not to mess with the glue. Escoda is with olive oil, dontcha know.
4. Varnish/lacquer
This is C Roberson & Co’s Universal Lacquer but don’t get confused, it’s for use on gold leaf.
5. Gold leaf
I use 23ct gold leaf, 20g. It comes in transfer sheets which are really easy to work with and one pack lasts for ages.
6. Gloves (cloth)
You can buy these from tons of places – they’re light cotton gloves. Breathable enough that your hands don’t sweat, thick enough that the oil on your skin won’t tarnish the gold.
Right that’s enough on the shopping list, now what do we do with them.
Method for Gilding on paper
Here’s how I used the above supplies to create my recent work “Change” which is on display right now at Chiara Williams Contemporary Art exhibition “Afternoon Tea” in Margate.
Step one – planning
First I created a grid to plan out the original drawing. This helps ensure that the buildings form the kind of overall shape I’m aiming for.

Step two – drawing
At this stage I’m drawing the detail of each building, but as I know I’m turning into a digital plate, I don’t have to worry too much about lines going over or minor errors. That’s what Photoshop is for.

Step three – digital print edition (giclee)
The drawing is finished as a digital plate and the edition is printed using archival ink on cotton rag paper.

Step four – creating the tear
In order to recreate the idea of Kintsugi or Kintsukuoroi, the work on paper becomes more sculptural, as the physical form of the paper combines with the content of the drawing.

Each print in the edition of 10 is hand-torn. Although the tear starts and ends in approximately the same location, the path of the tear naturally differs, meaning that each print in the edition is unique, while the original image itself remains consistent.
Step five – adhesive
The print is then carefully reassembled, with the two pieces matched back together as closely as possible. The glue or adhesive is then applied using a small brush. It’s absolutely essential that you take real care at this stage as the gold will stick exactly where you place the glue on the paper.

Here are some hints.
- Use a separate brush only for this stage.
- Pour some of the glue into a palette (I find ceramic is best for this) so that you can close the full bottle up as soon as possible after use
- Apply a small amount of soap to the brush before introducing the brush to the adhesive, otherwise you’ll end up with your brush hairs glued permanently together really quickly
- Follow the instructions on the bottle closely. In the example of the Polyvine, there are stated times to allow the glue to air dry and become tacky BEFORE even applying the gold. And then there’s a drying period after, before you can touch it or apply lacquer.
- Wash the brush with more soap as soon as you can after you’ve made the line you want.
TOP TIP: As I found when I made my first Kintsugi print, make sure that the original work is 100% dry before you use glue and gold, otherwise this happens..

d’oh!!!
Step six – gilding!
Once the glue line is tacky (because you’ve followed the instructions, right? Then you need to take a sheet on gold leaf and apply it gold side down on the glued area, pressing firmly from the back.
As it’s a transfer, the gold should lift away from the sheet and adhere to the paper, where the glue is place.

Then, you’re going to want to press the gold to the paper, and this is where you’re going to use those important gloves.
TOP TIP: I find that using just one glove on my right hand makes me focus on what I’m doing and prevents me getting gold or glue all over the place.

And the last stage of the gold bit, is to brush away the excess. This is where you’re going to use your second brush – not the one you used for glue!!

Assuming that you’ve allowed the adhesive to tackify properly (new word, you heard it here first) then you can use the brush to scrub gently at the edge of the line. This will remove all tiny crumbs of gold and give you a really crisp line.

Again, as you’re going to have flecks of gold flying around at this point, you will need to be completely sure that everything else on the page which is not the line you’re trying to create, is completely dry. No wet ink, no spots of glue. There’s nothing more depressing than adding a smear of glue where you don’t want one. Trust me..;)
Step 7 (Final step) – Varnish/Lacquer
Having left the work to dry completely (and following the instructions on the bottle of adhesive), you can then varnish the line of gold leaf that you’ve applied. If like me you’re applying fine lines, you’ll want to use a small brush to make sure you control the line. You want to be lacquering ONLY the gold and not the rest of the paper, because it will really show up if you’re hanging in an exhibition.

Here I used the same brush as I’ve used for the adhesive. I don’t use soap this time, but I do make sure I’ve cleaned it thoroughly before and straight after use.
Then, more drying because you need to let the lacquer dry.
Hey, I never said this wasn’t tedious.
Finished.

And there you go. Gold line complete.
This hand-finished edition, “Change” is on display in margate until 16th July.
More info on the work.
More info on the exhibition.


